Este enlace que cuelgo aqui es de gran interes para hacer una busqueda rapida cuando necesites programar con alguno de los lenguajes que aparecen como son: CSS, Javascript, HTML Character entities, PHP, MYSQL, MOD_REWRITE, Ruby on Rails, ASP/VBScript, RGB Hex Colors
Pincha en este link: http://www.anieto2k.com/2006/01/28/cheat-sheets/
miércoles, marzo 28, 2007
domingo, marzo 25, 2007
Paleta de colores en HTML
Dando un vuelta por la web encontre esta paleta de colores. Es bastante interesante para poder acertar el color en una página web. La subire al blog por si a alguien más le interesa. NOTA: la encontre en la wikipedia.
domingo, febrero 18, 2007
HTML TAGs
Estos muchos de los TAG que se pueden usar en una página HTML, y que hasta al momento desconocia muchos de ellos y algunos no sabia para que servian.
Este contenido me lo he copiado de la web: http://www.webscriptexpert.com/htmltags.html
Me lo copio en mi propio BLOG para poder consultarlo sin no tener que buscarlo.
Este contenido me lo he copiado de la web: http://www.webscriptexpert.com/htmltags.html
Me lo copio en mi propio BLOG para poder consultarlo sin no tener que buscarlo.
- <A></A> This element is what the hyperlinked structure of the World Wide Web is based on. It is used in two ways:
1. Create a hyperlink to another anchor (Link to another page or website)
2. Create an anchor in a document
- <ABBR></ABBR> Identifies that the content is an abbreviated form of some kind.
- <ACRONYM></ACRONYM> Identifies that some text is an acronym.
- <ADDRESS></ADDRESS> Specifies information such as authorship and contact details for the current document. Browsers should render the content with paragraph-breaks before and after.
- <APPLET></APPLET> Embed a Java applet into the document.
- <AREA></AREA> Used to implement a client-side image map.
- <AUDIOSCOPE> This element displays the audioscope, the graphical display of the amplitude of the current sound over time.
- <B></B> Change the text to bold.
<bold></bold> or <strong></strong> can also be used.
- <BASE> Supply a base address that must be used for resolving relative URI's to absolute URI's.
- <BASEFONT> Change the appearance of the default font that is used to draw the text.
- <BDO></BDO> This element overrides the bidirectional algorithm, the default algorithm to resolve the direction to show the text.
- <BGSOUND> Play a background sound when the page is opened. This element must be placed in the HEAD section of the document
.
- <BIG></BIG> Increase the current size of the font by 1. The maximum size is 7.
- <BLACKFACE></BLACKFACE> This element will render the text in a double-weight boldface font.
- <BLINK></BLINK> Changes the text to blinking. Drives people insane. *smiles*
- <BLOCKQUOTE></BLOCKQUOTE> This is used to enclose larger quotations from other works in the page
- <BODY></BODY> This element contains the body of the document. If a <HEAD> section is present in the page then the body must be placed after this section.
- <BQ></BQ> This element is an alias of the blockquote element.
- <BR> Line Break. Break the current line and continue on the next line.
- <BUTTON></BUTTON> This attribute creates a button that the user can push.
- <CAPTION></CAPTION> Specify the caption of a table. This element is only valid inside the TABLE element.
- <CENTER></CENTER> Centers everything inside the opening and closing element.
This tag is equivalent to <DIV align="center">.
- <CITE></CITE> Used for citations or references to other sources.
- <CODE></CODE> Used for source code examples.
- <COL> This element sets the attribute values for one or more columns.
- <COLGROUP> This element creates a column group and sets attribute values for all the columns in this group.
- <COMMENT></COMMENT> Used to insert comments in the HTML source which will be ignored by the browser. All HTML elements inside the comment will be ignored. You can use this code to put comments in your pages, which can help you when you have to edit the source later.
HTML generating programs sometimes store program-specific information inside comments,
so they will not be visible, but still available to the program.
This code is not a container, but inside it you can put one or more comments,
by surrounding with "--". The end of the code is indicated with the sequence -->.
- <DD></DD> The description of a term in a definition list.
- <DEL></DEL> This is a element that is used to indicate text that has been deleted.
-
- <DFN></DFN> This is a element that is used to indicate a word or phrase that is being defined.
- <DIR></DIR> Create a directory list.
- <DIV></DIV> This element is a general container for a part of the contents of a page.
Through the DIV element you can add attributes, like style information, to this whole division. The DIV element will not show anything when used without any other attribute. A division will terminate a paragraph opened with the P element.
<DIV align="center"> is the same as the deprecated <CENTER> element.
- <DL></DL> Create a definition list. This is a list where each item consists of two parts.
- <EM></EM> Put "emphasis" on the enclosed text.
- <EMBED></EMBED> The EMBED element lets you display output from a plug-in application in an HTML document.
- <FIELDSET></FIELDSET> Group a set of related controls in a form together.
- <FONT></FONT> Change the font which is used to draw the text.
- <FORM></FORM> Create a form inside a document.
- <FRAME> In a page with frames, this element defines how the a specific frame looks and what is initially shown inside the frame, when the framed page is loaded.
This element is only allowed inside a FRAMESET element.
- <FRAMESET></FRAMESET> Container for creating a document that consists of several frames.
- <H1></H1> The elements H1, H2, H3, H4, H5 and H6 are used to create several levels of headers, with H1 as the most important header and H6 as the least important.
- <HEAD></HEAD> Container for elements describing the current document. This section contains no contents the browser should display in the body of the text.
The following elements are allowed inside the HEAD section :
BASE
BASEFONT
BGSOUND
ISINDEX
LINK
META
SCRIPT
STYLE
TITLE
- <HR> Draw a horizontal rule.
- <HTML></HTML> The container for a complete HTML document.
- <I></I> Change the text to italic.
<italic></italic> can also be used.
- <IFRAME></IFRAME> This element is a container to create an inline or floating frame. A floating frame is a frame in which the contents of another HTML document can be seen.
- <ILAYER></ILAYER> With this element you can create several layers of content on a page. These layers can be stacked on top of each other, showing parts of underlying layers through non-occupied space.
- <IMG> Place an image in the document.
- <INPUT> Create a control for a form. A control is an element which the user can use to enter data, like textboxes, radiobuttons and checkboxes and is only valid inside the FORM element.
- <ISINDEX> This element will show an text input field. After pressing the <Enter> key the browser will construct a new URL, with the current address, a question mark and the text the user entered in the text field, and send it to the server
- <KBD></KBD> This is used to identify text that a user is supposed to enter.
- <LABEL></LABEL> Attach information to a specific field of a form.
- <LAYER></LAYER> With this element you can create several layers of content on a page. These layers can be stacked on top of each other, showing parts of underlying layers through non-occupied space.
- <LEGEND></LEGEND> Give the caption for a group of related controls, created with the FIELDSET element.
- <LI></LI> Identifies an item in a list.
- <MAP></MAP> This element is a container for the map that is used in a client-side image map.
- <MARQUEE></MARQUEE> This element is a container that enables you to create a scrolling text marquee.
- <MENU></MENU> A container for a list of menu items.
- <META> This element supplies meta-information about the current document.
- <NOBR></NOBR> The NOBR element stands for NO BReak. This means all the text between the start and end of the NOBR elements cannot have line breaks inserted between them.
- <NOEMBED></NOEMBED> This element defines content within EMBED content that is to be ignored by browsers that can activate the EMBED plug-in application.
- <NOFRAMES></NOFRAMES> This element provides a way to create alternative content that is intended for browsers that can't show frames, or are configured not to show them. A browser that displays the frames ignores the contents of the NOFRAMES element.
- <OBJECT></OBJECT> The object element allows the author to embed an object into the document. This element also replaces the APPLET element.
- <OPTION></OPTION> This describes an option in a listbox of a form.
- <P></P> This indicates a paragraph in the document. It is a container but most browsers allow you to omit the closing element.
- <PARAM> This element is for supplying parameters to a JAVA applet or another object and is only valid inside the APPLET and OBJECT elements.
- <PLAINTEXT></PLAINTEXT> All HTML elements inside this container are ignored by the browser, and shown as they were only text.
- <PRE></PRE> This element allows you to show preformatted text as it is, using the supplied whitespace of the text.
- <Q></Q> This is used to enclose short quotations from other works in the page.
- <S></S> Render text as strikethrough.
- <SAMP></SAMP> This element describes text that is output from a program.
- <SCRIPT></SCRIPT> This element adds the possibility of programming inside a HTML document by using a scripting language.
- <SELECT></SELECT> This element lets you create a listbox as an input field on a form.
- <SERVER></SERVER> This element is used to write JavaScripts that will be executed on the server, in the process of serving the page to the browser.
- <SMALL></SMALL> Draw the text using a smaller font than the one that is used for normal text.
- <SPACER> With a spacer you can control the horizontal whitespace that appears between words in a line, the vertical whitespace that appears between lines on a page, or set up rectangular spacing elements.
- <SPAN></SPAN> This element is used to create a structure in a document. By using this element you can give a part of the document a name, or apply style sheet information to the part.
- <STRIKE></STRIKE> Render text as strikethrough. Same as the <S> tag.
- <STRONG></STRONG> Render the text with strong emphasis.
- <STYLE></STYLE> This element is a container for style sheet elements to use with this document.
- <SUB></SUB> This is a container for text that should be displayed as a subscript, and, if practical, using a smaller font (compared with normal text).
- <SUP></SUP> Display the text as a superscript.
- <TABLE></TABLE>
Create a table layout which can contain cells in rows and columns. The cells of a table are specified with the TR, TH and TD elements.
- <TBODY></TBODY>
This element defines the body part of a table.
- <TD></TD>
The container for a cell in a table. Inside this you can put all the HTML coding
you want to appear in the cell.
- <TEXTAREA></TEXTAREA>
Define a multiline text field in a form. This element is only valid inside the FORM element.
- <TFOOT></TFOOT>
This element defines the footer of a table.
- <TITLE></TITLE>
Specify the title of the HTML document. This element is only allowed inside the HEAD element.
- <TR></TR>
Define a row inside a table.
- <U></U>
Underline your text.
- <UL></UL>
Create an unordered list of items, where unordered means the individual items are not numbered, but have a bullet in front of them. If you want numbered items use an ordered list. The items in the list are identified with the LI element.
- <VAR></VAR>
Used to describe a metasyntactic variable, where the user is to replace the variable with a specific instance. Typically displayed in italics.
- <WBR>
The WBR element stands for Word Break.
sábado, febrero 10, 2007
Getting Things Done
Mi última adquisión es cuestiones de libros es "Getting Things Done: The Art of Stress-Free Productivity" del David Allen . Yo me lo he comprado en amazon por que no lo he podido encontrar en otro sitio cenca de mi ciudad y aprovechando que un amiguete queria algunos libros más pues me decidi a comparlo on-line.
Ya os contare las conclusiones que he sacado sobre el tema.
Ya os contare las conclusiones que he sacado sobre el tema.
domingo, febrero 04, 2007
Script Galeria de Imagenes
Este es el código fuente de un script para ver las imagenes. Sólo permite adelantar y retroceder en las imagenes. No hay una visualizacion previa.
Este script podemos introducirlo en la propia pagina que lo va a utilizar o en un fichero externo.
El código coloreado es el más importante y es el que hay que tener cuidado para no estropear el script.
<script LANGUAGE="JavaScript">
// slider wbc /with button control
// javascriptfacil · www.javascriptfacil.com
var myPix = new Array("000.gif"," 013.jpg","015.jpg","019.jpg","025.jpg","031.jpg","033.jpg","035.jpg","041.jpg","045.jpg","049.jpg")
var thisPic = 0
function processPrevious() {
if (document.images && thisPic > 0) {
thisPic--
document.myPicture.src=myPix[thisPic]
}
}
function processNext() {
if (document.images && thisPic < 10) {
thisPic++
document.myPicture.src=myPix[thisPic]
}
}</script>
Este script podemos introducirlo en la propia pagina que lo va a utilizar o en un fichero externo.
<table WIDTH="600" CELLPADDING="1" CELLSPACING="0" BORDER="0">
<tr>
<td WIDTH="100%" BGCOLOR="#FFC082" VALIGN="TOP"><div align="center"><center><table
WIDTH="100%" CELLPADDING="6" CELLSPACING="0" BORDER="0">
<tr>
<td WIDTH="100%" bgColor=#8BB7E2 VALIGN="TOP"><p ALIGN="CENTER"> </p>
<p ALIGN="CENTER">
<p ALIGN="CENTER"><font FACE="Arial"><b>
</tr>
</table>
</center></div></td>
</tr>
</table>
<tr>
<td WIDTH="100%" BGCOLOR="#FFC082" VALIGN="TOP"><div align="center"><center><table
WIDTH="100%" CELLPADDING="6" CELLSPACING="0" BORDER="0">
<tr>
<td WIDTH="100%" bgColor=#8BB7E2 VALIGN="TOP"><p ALIGN="CENTER"> </p>
<p ALIGN="CENTER">
<img src="000.gif" width="300" height="225" VSPACE="0" HSPACE="0" BORDER="0" LOOP="0" NAME="myPicture"></p>
<p ALIGN="CENTER"><font FACE="Arial"><b>
<a HREF="javascript:processPrevious()"><<Anterior</a> |
<a HREF="javascript:processNext()">Siguiente>></a></b></font></p>
<p ALIGN="CENTER"> </td><a HREF="javascript:processNext()">Siguiente>></a></b></font></p>
</tr>
</table>
</center></div></td>
</tr>
</table>
El código coloreado es el más importante y es el que hay que tener cuidado para no estropear el script.
Pre-Carga de imagenes mediante un script.
Más código fuente de JavaScript en un fichero externos llamado: progressbar.js. En este archivos tenemos el siguiente codigo fuente
Este código es muy útil si se tienen que cargar muchas imagenes pesadas.
// Progressbar - Version 2.0
// Author: Brian Gosselin of http://scriptasylum.com
// PUT THE NAMES OF ALL YOUR IMAGES THAT NEED TO BE "CACHED" IN THE "imagenames" ARRAY.
// DONT FORGET THE COMMA BETWEEN EACH ENTRY, OR THE TICK MARKS AROUND EACH NAME.
// WHEN ALL THE IMAGES ARE DONE LOADING, THE "imagesdone" VARIABLE IS SET TO "TRUE"
// Aca deberás declarar las imágenes que desees que sean precargadas
var imagenames=new Array( 'index2/0001.gif' , 'index2/0002.gif' , 'index2/0003.gif' , 'index2/arriba_derc.jpg' , 'index2/arriba_izq3.jpg' , 'index2/arriba_medio.gif' , 'index2/bajo_der2.jpg' , 'index2/bajo_izq2.jpg' , 'index2/bajo_medio2.jpg' , 'index2/medio_der.jpg' , 'index2/medio_izq.jpg' , 'index2/0_00.gif' , 'index2/0_01.gif' , 'index2/0_02.gif' , 'index2/0_03.gif' , 'index2/0_04.gif' , 'index2/0_05.gif' , 'index2/cohete.gif' , 'index2/nenaX.gif' , 'index2/oscar.gif' , 'index2/sa- en-carbon.gif' , 'index2/xavi2.gif' , 'index2/oir.jpg' , 'index2/amigos3.gif' , 'index2/coc2.gif' );
var yposition=300; // Posición en que se carga la barra desde la posición
var xposition=206; // de arriba de la ventana, en Pixels.
var loadedcolor='#207BD' ; // Color del progreso de la barra.
var unloadedcolor='#FFFFFF'; // Color del Fondo, del área que no ha sido cargada.
var barheight=15; // Alto de la Barra de progreso en Pixels (Mínimo 25)
var barwidth=265; // Ancho de la Barra en Pixels
var bordercolor='Black'; // Color del Borde
// Modificación realizada por Gabriel M. Rodríguez ( webmaster@gamarod.com.ar)
// que muestra en la barra de estado, la cantidad de imágenes cargas y
// el redireccionamiento cuanda la carga de las imágenes finaliza.
// A partir de aca no hace falta tocar nada.
// -----------------------------------------
//DO NOT EDIT BEYOND THIS POINT
var NS4 = (navigator.appName.indexOf("Netscape")>=0 && parseFloat(navigator.appVersion) >= 4 && parseFloat(navigator.appVersion) < 5)? true : false;
var IE4 = (document.all)? true : false;
var NS6 = (parseFloat( navigator.appVersion) >= 5 && navigator.appName.indexOf("Netscape")>=0 )? true: false;
var pagina="index2.htm"
var imagesdone=false;
var blocksize=barwidth/(imagenames.length );
barheight=Math.max(barheight,25);
var loaded=0, perouter, perdone, images=new Array();
var txt=(NS4)?'<layer name="perouter" bgcolor="'+bordercolor+'" visibility="hide">' : '<div id="perouter" style="position:absolute; visibility:hidden; background-color:'+bordercolor+'">';
txt+='<table cellpadding="0" cellspacing="1" border="0"><tr><td width="'+barwidth+'" height="'+barheight+'" valign="center">';
if(NS4)txt+='<ilayer width="100%" height="100%"><layer width="100%" height="100%" bgcolor="'+unloadedcolor+'" top="0" left="0">';
txt+='<table cellpadding="0" cellspacing="0" border="0"><tr><td valign="center" width="'+barwidth+'" height="'+barheight+'" bgcolor="'+unloadedcolor+'"><center><font color="'+loadedcolor+'" size="1" face="arial">Cargando imágenes en korkishouse ...</font></center></td></tr></table>';
if(NS4) txt+='</layer>';
txt+=(NS4)? '<layer name="perdone" width="100%" height="'+barheight+'" bgcolor="'+loadedcolor+'" top="0" left="0">' : '<div id="perdone" style="position:absolute; top:1px; left:1px; width:'+barwidth+'px; height:'+barheight+'px; background-color:'+loadedcolor+'; z-index:100">';
txt+='<table cellpadding="0" cellspacing="0" border="0"><tr><td valign="center" width="'+barwidth+'" height="'+barheight+'" bgcolor="'+loadedcolor+'"><center><font color="'+unloadedcolor+'" size="1" face="arial">Cargando imágenes en korkishouse ...</font></center></td></tr></table>';
txt+=(NS4)? '</layer></ilayer>' : '</div>';
txt+='</td></tr></table>';
txt+=(NS4)?'</layer>' : '</div>';
document.write(txt);
function loadimages(){
if(NS4){
perouter=document.perouter;
perdone=document.perouter.document.layers[0].document.perdone;
}
if(NS6){
perouter=document.getElementById('perouter');
perdone=document.getElementById('perdone');
}
if(IE4){
perouter=document.all.perouter;
perdone=document.all.perdone ;
}
cliplayer(perdone,0,0,barheight,0);
window.onresize=setouterpos;
setouterpos();
for(n=0;n<imagenames.length;n++){
images[n]=new Image();
images[n].src=imagenames[n];
setTimeout('checkload('+n+')' ,n*100);
}}
function setouterpos(){
var ww=(IE4)? document.body.clientWidth : window.innerWidth;
var x=(ww-barwidth)/2;
if(NS4){
perouter.moveTo (x,yposition);
perouter.visibility="show";
}
if(IE4||NS6){
perouter.style.left=x+'px';
perouter.style.top=yposition+'px';
perouter.style.visibility="visible";
}}
function dispbars(){
loaded++;
window.status="Precarga de las imágenes ... "+loaded+" / "+imagenames.length;
cliplayer(perdone, 0, blocksize*loaded, barheight, 0);
if(loaded>=imagenames.length)setTimeout('hideperouter()', 800);
}
function checkload(index){
(images[index].complete)? dispbars() : setTimeout('checkload('+index+')', 100);
}
function hideperouter(){
(NS4)? perouter.visibility="hide" : perouter.style.visibility="hidden";
imagesdone=true;
window.status='Pagina Cargada ...';
privenmax=window.open('index2.htm');
}
function cliplayer(layer, ct, cr, cb, cl){
if(NS4){
layer.clip.left=cl;
layer.clip.top=ct;
layer.clip.right=cr;
layer.clip.bottom=cb ;
}
if(IE4||NS6)layer.style.clip='rect('+ct+' '+cr+' '+cb+' '+cl+')';
}
window.onload=loadimages;
Este código es muy útil si se tienen que cargar muchas imagenes pesadas.
miércoles, enero 24, 2007
Metas a utilizar en un pagina web para que los robots de busqueda indexen tu web.
Como siempre me pasa lo mismo con los metas en las paginas web, he pensado colgar un ejemplo para no tener que ir buscando como se contruyen y que función tiene cada uno de ellos.
Como ejemplo he buscado los METAS que utiliza la web de www.cuatro.com.
De paso aprovecho para colocar las etiquetas indispensables de TITLE, CSS, y de los SCRIPTS.
Para más información se puede visitar este LINK.
Como ejemplo he buscado los METAS que utiliza la web de www.cuatro.com.
<meta name="Generator" content="PRISACOM S.L." />
<meta name="keywords" content="cuatro, television, sogecable, cadena, generalista, abierto, programas, series, noticias, informativos, actualidad, late night, presentadora, videos, gratuito, gabilondo, tv, humor, concurso, documentales, vidas contadas, cuatrosfera, noche, fotos, galeria, deportes, parrilla, programacion, entrevistas, gavilondo, eva hache, boris izaguirre, roma, house, cocina, chef, sorteo once" />
<meta name="Origen" content="CUATRO TV" />
<meta name="Description" content="La mejor televisión de entretenimiento en español" />
<meta name="Author" content="Sogecable, S.L." />
<meta name="Locality" content="Madrid, España" />
<meta http-equiv="Content-Type" content="text/html; charset=iso-8859-15" />
De paso aprovecho para colocar las etiquetas indispensables de TITLE, CSS, y de los SCRIPTS.
<title>cuatro.com - Cuatro.com</title>
<link rel="stylesheet" href="/css/estilos.css" type="text/css" />
<script type="text/javascript" src="/js/generic.js"></script>
<link rel="stylesheet" href="/css/estilos.css" type="text/css" />
<script type="text/javascript" src="/js/generic.js"></script>
Para más información se puede visitar este LINK.
domingo, enero 21, 2007
Codigo fuente: Script muestra imagenes aleatorias
Este es un script interesante para mostrar de manera aleatoria una imagen. Cada vez que entre alguien en el la url donde utilices esta script le aparecera una nueva imagen.
 <SCRIPT LANGUAGE="JavaScript">
<!-- Begin
var how_many_ads = 7;
var now = new Date()
var sec =  now.getSeconds()
var ad = sec % how_many_ads;
ad +=1;
if (ad==1) {

alt="luis.com-> BARNY es el puto AMO, pues LUIS.COM es el REY KORKI :::";
banner="luis.jpg ";
width="400";
height="400";
}
if (ad==2) {

alt="El Come Mierda hacindo una demostracion magistral .:..";
banner="tarek.jpg";
width="400";
 height="400";
}
if (ad==3) {

alt="javi.com-> Este es mas BARNY aun...¿quien puede beberse una caja de 25 latas en un par de horas?? el";
banner="javi.jpg";
width="400";
height="400";
}
if (ad==4) {


alt="jaime.com-> Jaume DJ a los limones con nuestro temazo RON CUBANO";
banner="jaime.jpg";
width="400";
height="400";
}
if (ad==5) {

alt="felipe.com-> MONGOL o ALCOHOL???";
banner="david2.jpg";
width="400";
height="400";
}
if (ad==6) {

alt="Cadena de Restaruantes TAREK KEBAB. McCagalera, Burroking, Tortura Kebab";
banner="kebab.jpg";
width="400";
height="400";
}
if (ad==7) {

alt="Cuando el cuerpo pide comida te comes hasta los huevos, ...pues eso: 3h+Ballantines+CASTAÑON=bocata de palo";
banner="bocata_palo.jpg";
width="400";
height="400";
}
document.write('<center>');

document.write('<img src=\"' + banner + '\" width=')
document.write(width + ' height=' + height + ' ');
document.write('alt=\"' + alt + '\" border=0><br>');

document.write('</center>');
// End -->
</SCRIPT>
sábado, enero 13, 2007
Mis nuevos libros para el 2007
Despues de lo satisfecho que quede con la adquisición de mi primer libro WROX "Profesional CSS Hojas de estilo en cascada para el diseño Web " he decidido comprarme algun que otro libro como estos:
"Profesional JAVASCRIPT para desarrolladores Web"
"Profesional Ajax"
ya contare que tal son, pero seguro que no me decepcionaran.
--
_________________
Carlos Mezquida
_________________
"Profesional JAVASCRIPT para desarrolladores Web"
"Profesional Ajax"
ya contare que tal son, pero seguro que no me decepcionaran.
--
_________________
Carlos Mezquida
_________________
domingo, marzo 26, 2006
Ampliando conocimientos
Despues de mucho dar vueltas y vueltas y de mirar por miles y miles de paginas web para encontrar la informacion que deseo, he pensado en comprarme un libro, que de momento esta bien. Lo curioso es que me entretiene mas un libro tecnico o manual que una novela. Es por ello que me he comprado el siguiente libro
Es un libro muy interesante para la gente inquieta y que quiera saber mas sobre algunos temas de CSS. Yo estoy convencido que los CSS y estandares web son el futuro. Llevo varios años practincando la web y cuando descubri los CSS me enamoraron. Se acabo el tener que tocar mil cosas cuando hay que hacer modificaciones.
Prólogode Happy Zeldman
Fundador de Happy Cog Studios
ANAYA multimedia
ISBN:84-415-1954-4
Profesional CSS hojas de estilo en cascada para el diseño webNo soy partidario de comprarme libros, por que todo lo que necesito siempre lo encuentro en internet, pero es que estoy cansado de siempre ir buscando como un loco y al final nunca recuerdas donde encontraste esa informacion.
Es un libro muy interesante para la gente inquieta y que quiera saber mas sobre algunos temas de CSS. Yo estoy convencido que los CSS y estandares web son el futuro. Llevo varios años practincando la web y cuando descubri los CSS me enamoraron. Se acabo el tener que tocar mil cosas cuando hay que hacer modificaciones.
Profesional CSS hojas de estilo en cascada para el diseño web
Prólogode Happy Zeldman
Fundador de Happy Cog Studios
ANAYA multimedia
ISBN:84-415-1954-4
domingo, febrero 19, 2006
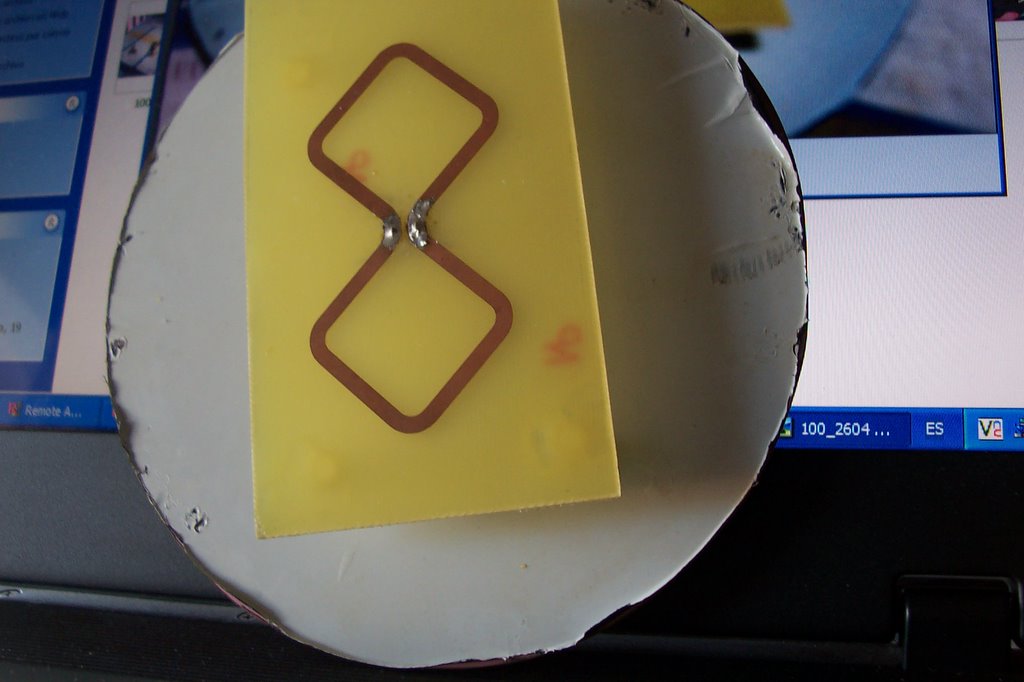
Bi-Quad Antenna
Esta es una antena Bi-Cuadrada (Bi-Quad Antenna) diseña y fabricada por Carlos Mezquida, para el proyecto de final de carrera. Se trata de una antena de una antena direccional que se puede usar tanto de manera directa, es decir, conexion directa a equipos wifi o usarla como foco de una parabilica, obteniendo unas distancias de conexion de mas de 35Km. (Pruebas realizadas en la UPV-Gandia).

Dicha antena esta compuesta por dos placas de fibra de vidrio, placas tipicas para la insolacion de circuitos. Cada una de ellas tiene una funcion.
[1]La placa rectangular, tiene impresa el dibujo de la antena Bi-Cuadrada. Esta antena esta compuesta por dos cuadrados de identicas dimensiones y con las puntas redondeadas, para que el reparto de campo electrico sea continuo.
Esta es la antena propiamente dicha.
[2]La placa circular, hace las funciones de plato reflectante. Es decir, por si solo la placa rectangular ya es una antena, pero en este caso seria sectorilal, frontal+trasera, pero como solo queremos que nuestra antena radie en una direccion, le adjuntamos este plato.
Ademas de estos dos elementos, necesitaremos de unos pivotes puestos a una distancia exacta para obtener las mejores medidas.
Otro componente importante, es el conector. Hemos utilizado un conector SMA de chasis, para facilitar las medidas de campo.
Este proyecto esta inspirado en los estudios de TREVOR MARSHALL
Cable y Conectores para WIFI
Es importante saber que no todos los cables son buenos para poder usarlo en las red Wifi. El motivo por cual podriasmo necesitar utilizar un cable para wifi ( frecuencias de 2,4Ghz) pueden ser diversas. Desde utilizarlos por que nuestro equipo para wifi esta lejos de las propia antena wifi, o que queramos usar una antena wifi disinta de la que llevan incorporados los propios equipos wifi, fabricacion de una antena artesanal ( busca en google antenas wifi), etc ...
En cuanto a los cables, es importante usar una cable de bajas perdidas a altas frecuencias. Despues de esto, hay una grana gama de marcas. Lo mejor para no equivocarse es ir a una tienda de electronica y preguntar por estos cables. Normalmente, los cables RG58 (50ohms) son los mejores, pero dependiendo del grosor y longuitud nos puede resultar un poco caros estos cables.


En cuanto a los conectores, este tema es mas peculiar, cada equipo wifi usa unos conectores propoios (estos fabrantes son muy listos). Dependiendo de cada abricante compraremos conectores SMA o N.
Despues de saber el tipo de conector, faltara saber si el que usaremos para la antena es macho o hembra, y luego si es reverse o inverse.
Os muestro mas conectores.

Mi enlace Wifi
Tengo en el mismo edificio un despacho y mi vivienda, y como me gusta estar continuamente conectado pense en usar un radio enlace wifi para conectar las dos casas y una sola conexion ADSL.
Para ello me compre dos AP (DWL-900AP+) que estan a muy buen precio y a pesar de ser a 11Mbps me sobra para el uso que le doy.
Como soy partidario de no usar equipos que no sean de intemperie en la calle, me las ingenie para solo poner en la calle la antena del AP y dejar el AP dentro de casa.
Para que os hagais una idea de lo que he hecho, lo podeis ver en las fotos siguientes.

Como podemos ver en la fotos, en la primera tenemos una caja estanca en la frontera de la finca, en la que realmente hay SOLO la antena que viene con el AP D-Link (antena omnidireccional), lo interesante es que me compre conectores SMA (casi toda a gama) para poder hacer un cable que una esta antena con el AP que esta a unos 5 metros de distancia.
Este montaje me proporciona unas grandes ventajas ya que tengo casi todo mi ancho de banda tanto en el despacho como en mi casa.

En la otra imagen, he metido el AP D-Link, para que no molestara el aparato por la casa dentro de una caja estanca mas grande. A esta caja le llega un cable de alimentacion y el cable que conecta a la antena. Como ya no tengo el AP en la calle no hay peligro de cortocircuito por los cables de luz.
El cable azul que aparece la foto, no es mas que un cable de red, para poderme dar cobertura inalambrica a toda mi casa, y que va conectada a un AP Buffalo (BUFFALO WLA-G54C) a 54Mbps.

(Nota: para esconder un el AP Buffalo, lo que colocado debajo de un sofa/cama para que no se vea.
Por lo tanto el material que tengo en mi casa es:
[1] Una antena dentro de una caja estanca en la terraza de casa (antena propietaria del AP)
[2] Cable que he hecho con los conectores apropiados y que conecta al AP.
[3] Un AP D-Link -DWL-900AP+ (11Mbps)
[4] AP Buffalo -BUFFALO WLA-G54C (54Mbps)
Y en mi despacho tengo:
[5] Una antena dentro de una caja estanca en la terraza de casa (antena propietaria del AP)
[6] Cable que he hecho con los conectores apropiados y que conecta al AP.
[7] Un AP D-Link -DWL-900AP+ (11Mbps)
[8] Switch de interconexion de mi red de cable y mi red wifi.
Por lo tanto, no tengo un cable de luz en la calle y que le conecta a la red electrica de mi casa y tampoco tengo el AP en la calle.
Es importante, por temas de fabricantes, que los equipos que se vayana a utilizar para los radioenlaces sean de la misma marca y fabricantes, para no tener problemas de compatibilidades.
Los AP D-Link estan en modo BRIDGE para hacer el radio enlace, y el Buffalo esta en modo infraestructura para darme covertura.
Espero que esto os sirva, otro dia os contare mis otros proyectos wifi. [MEZ I - II]
Para ello me compre dos AP (DWL-900AP+) que estan a muy buen precio y a pesar de ser a 11Mbps me sobra para el uso que le doy.
Como soy partidario de no usar equipos que no sean de intemperie en la calle, me las ingenie para solo poner en la calle la antena del AP y dejar el AP dentro de casa.
Para que os hagais una idea de lo que he hecho, lo podeis ver en las fotos siguientes.
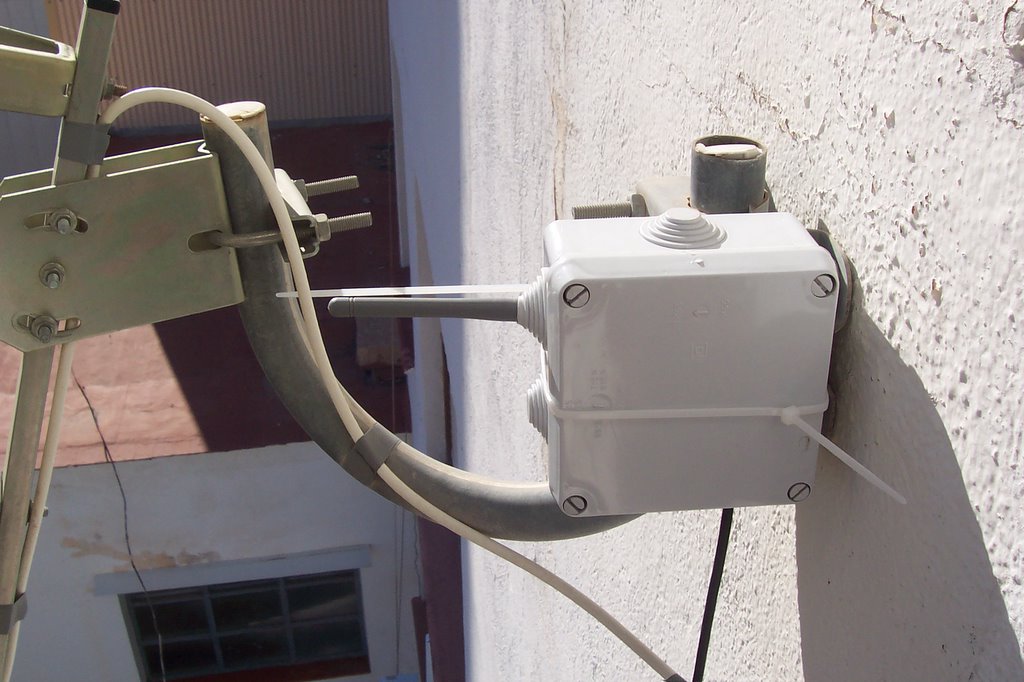
Como podemos ver en la fotos, en la primera tenemos una caja estanca en la frontera de la finca, en la que realmente hay SOLO la antena que viene con el AP D-Link (antena omnidireccional), lo interesante es que me compre conectores SMA (casi toda a gama) para poder hacer un cable que una esta antena con el AP que esta a unos 5 metros de distancia.
Este montaje me proporciona unas grandes ventajas ya que tengo casi todo mi ancho de banda tanto en el despacho como en mi casa.
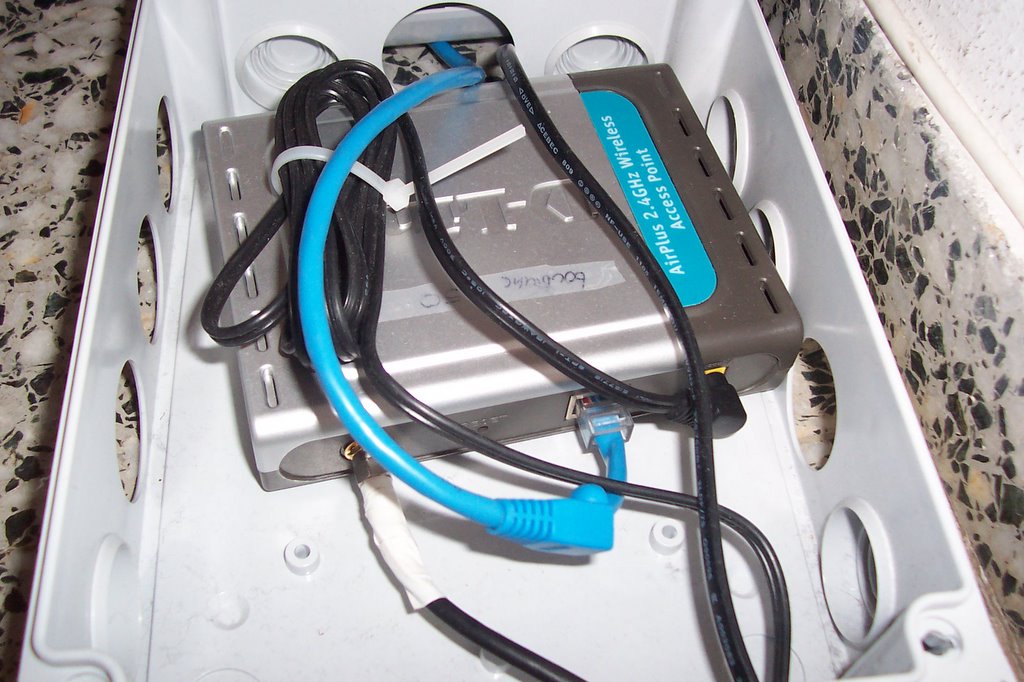
En la otra imagen, he metido el AP D-Link, para que no molestara el aparato por la casa dentro de una caja estanca mas grande. A esta caja le llega un cable de alimentacion y el cable que conecta a la antena. Como ya no tengo el AP en la calle no hay peligro de cortocircuito por los cables de luz.
El cable azul que aparece la foto, no es mas que un cable de red, para poderme dar cobertura inalambrica a toda mi casa, y que va conectada a un AP Buffalo (BUFFALO WLA-G54C) a 54Mbps.

(Nota: para esconder un el AP Buffalo, lo que colocado debajo de un sofa/cama para que no se vea.
Por lo tanto el material que tengo en mi casa es:
[1] Una antena dentro de una caja estanca en la terraza de casa (antena propietaria del AP)
[2] Cable que he hecho con los conectores apropiados y que conecta al AP.
[3] Un AP D-Link -DWL-900AP+ (11Mbps)
[4] AP Buffalo -BUFFALO WLA-G54C (54Mbps)
Y en mi despacho tengo:
[5] Una antena dentro de una caja estanca en la terraza de casa (antena propietaria del AP)
[6] Cable que he hecho con los conectores apropiados y que conecta al AP.
[7] Un AP D-Link -DWL-900AP+ (11Mbps)
[8] Switch de interconexion de mi red de cable y mi red wifi.
Por lo tanto, no tengo un cable de luz en la calle y que le conecta a la red electrica de mi casa y tampoco tengo el AP en la calle.
Es importante, por temas de fabricantes, que los equipos que se vayana a utilizar para los radioenlaces sean de la misma marca y fabricantes, para no tener problemas de compatibilidades.
Los AP D-Link estan en modo BRIDGE para hacer el radio enlace, y el Buffalo esta en modo infraestructura para darme covertura.
Espero que esto os sirva, otro dia os contare mis otros proyectos wifi. [MEZ I - II]
Mi Red Wifi en casa
He pensado, que lo que hago en mis ratos libres, pues a lo mejor puede interesar a alguien, y si no es así, por lo mejor, lo documento para la posteridad.
Soy un gran aficionado a las conexiones WIFI, de hecho, mi proyecto de final de carrera fue una antena Wireless a 2,4Ghz. No creo que hayais oido hablar de las antenas Bicuadradas (Bi-Quad).
Bueno, hoy explicare mi enlace wifi y otro dia, os explicare en que consiste mi antena Bi-Quad.
Tengo un radio enlace wifi desde mi despacho a mi casa. Estas dos ubicaciones estan en el mismo edificio, pero en diferentes pisos por lo que con una sola conexion ADSL puedo abastecer las dos plantas.
No soy partidarios que los equipos electricos que no esten preparados para la inteperie esten en la calle por lo que me he hecho unos cables para poder conectar mis AP a sus respectivas ANTENAS.
Por si no me explico bien, tengo lo siguiente en cada una de las casa.
[1] Una antena dentro de una caja estanca en la terraza de casa (antena propietaria del AP)
[2] Cable que he hecho con los conectores apropiados y que conecta al AP.
[3] Un AP D-Link -DWL-900AP+ (11Mbps)
[4] AP Buffalo -BUFFALO WLA-G54C (54Mbps)
[5] Una antena dentro de una caja estanca en la terraza de casa (antena propietaria del AP)
[6] Cable que he hecho con los conectores apropiados y que conecta al AP.
[7] Un AP D-Link -DWL-900AP+ (11Mbps)
[8] Switch de interconexion de mi red de cable ymi red wifi.
Vía Aérea Difícil
Este es el enlace de la página web de INTUBACION.ORG http://www.intubacion.org
En ella se encuentra la información necesaria para saber como funcionan estos cursos y poder matricualrte en ellos.
Dentro este este bloque, los cursos se han dividido en 4 modulos todos ellos independientes, pero estrechamente relacionados entre si.
En ella se encuentra la información necesaria para saber como funcionan estos cursos y poder matricualrte en ellos.
Dentro este este bloque, los cursos se han dividido en 4 modulos todos ellos independientes, pero estrechamente relacionados entre si.
Fin de semana inmejorable en TORRALBA
 El fin de semana del 4-5-6 de febrero, fuimos al perdido pueblo de LIDON, TORRALBA del PINAR.
En este encuentro fuimos los siguiente: Xavi, Carlos+Mer, Jaume, MJ+Pablo, Migrate, Lidon, Juane+MJ, Nacher+Tais, Marisa+JoanLuca...
Fue uno de los fines de semana mas buenos desde hace mucho tiempo. Solo con ver algunas de las fotos del acontecimiento sobran las palabras.
http://www.flickr.com/photos/90352238@N00/

http://www.flickr.com/photos/36582517@N00/
Monitos Tour 2006
 En este nuevo año tenemos previstas una serie de escursiones a pie o/y en mountainbike en la Marina Alta y poco más para disfrutar y conocer esos parajes tan impresionantes que no vemos desde dentro de la ciudad
Los MONITOS, nos lo iran contando paso a paso.
viernes, enero 06, 2006
Bienvenidos ...
Estas son la primeras letras que escribo es mi weblog. He creado este weblog para presentar a la comunidad web mis inquietudes, actividades, y mis pocos conocimientos, eso si, ampliables hasta el infinito, o hasta que el cafe lo permita.
Suscribirse a:
Entradas (Atom)